
Figure 47: The basic workflow of our software for controlling and analyzing things!
You will need several software packages for the class, as described below. A summary of the links are given here for convenience.
Welcome to the 6.302x software guide. For working with the labs, we've designed a set of software that should let you easily vary feedback control parameters in live-running systems controlled by your Arduino. This software is brand new, and part of what we're doing with this iteration of the course is testing it out. It is all open-source, and built using open-source tools (part of why we picked Arduinos!) so if you want to mess with it, do whatever you want with it, just be aware that if you change things about it, it may not work, so be ready to re-download the code if needed!
The idea behind the code is shown in the Figure 47 below.
The Arduino interfaces with the propellor arm by sending pulse-width modulated (pwm) signals to the transistor motor driver and by reading the angle sensor and motor coil voltages. Its pwm output signal is derived from sensor and motor readings in a feedback control loop (that you will modify). The control loop's behavior is adjusted by values/parameters sent to it from a python-based local server running on your computer using serial communication. In addition, at regular intervals, the Arduino sends its measurements back to the Python server.
The python-based local server running on your computer is an interface. It communicates with the Arduino via serial link, and with a Browser-based GUI via WebSockets.
The Browser-based GUI plots measured data from the Arduino, passed to it by the local server, and provides simple interface for users to change the Arduino feedback loop parameters, which it passes on to the local server.
The entire package of software is broken down into three pieces:
Microcontroller Code: This is the code uploaded to the Arduino (the .ino file). It sets the Arduino up for listening to and controlling the electronics as well as taking in parameters and reporting values to your computer over serial (the USB cable). It is written in Arduino's C/C++ type language.
Server Code: This is a Python script that talks with the Arduino over serial, does some calculations, and then talks with the GUI code in your browser. It is the "middle-person" of our software stack.
GUI Code: Your GUI (Graphical User Interface) is basically just a web-page that is hosted on your machine. It is written in standard html/css/javascript. Don't worry, it is locally hosted and only you have access to it! It lives at localhost:3000 in your browser url field when the server script is running.
Why did we pick a browser-based GUI for controlling the arm?:
The reason really comes down to compatibility across lots of platforms. One of the goals we have with this course is to see how effectively we can enable the study of control theory in a distributed environment (as in we're here in Massachusetts, USA, and you are anywhere in the world). Python does a pretty good job of maintaining libraries that function reliably (or at least predictably) across the Windows/Mac/Unix/Linux spectrum, but plotting/graphics, particularly in real-time, is something that is bit tougher to do across all platforms. Web Browsers can be seen as a nice solution to this problem. Pretty much everybody and their respective operating system has a web browser, and most modern web-browsers can provide a uniform environment in which we can deploy graphics, since graphics in the browser are pretty standardized (with some exceptions). So we chose the browser for that sort of uniformity it provides us (and hopefully you!)
What languages and libraries are used?
Well, the Arduino flavor of C/C++ is used for the Arduino.
For the Python software we use the following libraries:
Flask and its support for Eventletis used for creating a functioning WebSocket server. This guy is basically like the Flask expert and his work was very helpful in getting this aspect of the software working
Pyserial is for its ability (as its name suggests) to give Python reliable serial port access.
For the Web GUI, standard html, css, Javascript, Bootstrap, jQuery were all used. Plotting was done using the D3 library.
Can I use a Microcontroller Other than the Arduino?:
The general idea of this software is definitely not Arduino-specific, so if you'd like to try and make it work with other commonly-available microcontrollers (Teensy, TI LaunchPad family, etc...) it should be possible since the code we use relies only on "standard" libraries. That being said, we've only tested this on Arduino and Teensy 3.2 and so our help in getting this to work on other platforms may be limited.
The code distribution we'll use for this software introduction is found here. This is the base file for testing and setting up. While the Python and html/javascript files are the same for all labs, we use different microcontroller code sets for each lab so you will need to download them for each lab.
Download the .zip file, extract it, and look inside. You'll see the following things:
An empty directory called csv_files. Don't worry about this thing for right now.
The file server.py. This is the Python script you will run on your machine for establishing communiation with your Arduino and browser GUI (Graphical User Interface)
The file index.html. This is a webpage that acts as your GUI.
The file req.txt. This is a file that lists libraries needed in addition to normal Python. Don't worry about it right now, but we'll use it during install.
The directory static. This has the javascript/css libraries your browser GUI uses. We use local copies of these libraries so you can run this software when not connected to the internet. Just leave this as it is.
Two directories called teensy_test and arduino_test. These contain simple communication check microcontroller code files for both the Arduino Uno and the Teensy 3.2. They are good "sanity check" files.
Ok onto the install. We'll first start with the Arduino Environment.
In the standard way of taking this course, you'll be using a Teensy to directly control the systems we're analyzing. We'll recommend the Teensyduino add-on for the Arduino environment to get your Teensy code up and running. This will firstly require the Arduino Environment to be working.
Depending on what your background is, you can either just head on over to the Arduino Download Site and make sure the Arduino you're using can successfully run something like the classic "blinky.io" sketch (this will just ensure the entire Arduino/code workflow is functioning).
If the above paragraph didn't make a ton of sense, and/or you'd like more details with the install, Arduino has some nice walkthroughs for each of the big operating system families:
If you're new to Arduino, don't worry! We don't really require any actual coding of the Teensy in this course since we'll provide you the code files that do what we need to do in lab. All we really need for you to do is to be able to upload an Teensy script (.ino file) onto the Arduino using the IDE. Following the step-by-steps above should get you up through this point. If you run into problems, check out the Arduino Troubleshooting Page.
Of course, you're totally free to look and experiment with the Teensy. Teensy are cool. Just remember if you change the provided .ino code, it may not work so be prepared to re-download a working copy if needed!
If you are using a Teensy, once you've got your Arduino IDE working, go to the PJRC software site at this location and follow the instructions for adding their Teensy add-on software. This stuff has been shown to work on all OS's!
Connect the Teensy to your computer using the a USB to USB-micro cable, and then open up the teensy_tst.ino file in the Arduino IDE. Try to download the file on to the Teensy by clicking the download arrow in the tools bar for the Arduine IDE. If the file fails to download, try pushing the Arduino reset button and then try downloading the file two more times. If, after those tries, the file still fails to download, go to to the Arduino's Tools section. Verify that there is a line in that section like Board:Teensy 3.1/2 . If not, click on Board , and then select the Teensy 3.1/2.
After you upload the test file (teensy_test for the Teensy 3.2), nothing will happen. This code won't do anything on its own, but is pre-configured to interact with the Python and web-GUI which you'll install (next!!)
Windows does not come with Python usually. If you already have it, determine what version you have:
If it is Python 2, make sure it is at or above Python v2.7.9
If it is Python 3, make sure it is at or above Python v3.4
One easy way to check on your Python is to open up a PowerShell up and inside, type:
python --version
Some text should come back telling you if you have Python and what version it is. Red text probably means you don't have it. Our code should work on both Python versions 2.7 and above as well as Python 3.3 and above. If you do not have Python installed, you will need to do that. I'd recommend getting Python 3 for this software, though both families (2.7+ and 3+ will work). Go to the Python Download Page, find the appropriate install version for your computer (I'd recommend the .exe installer if you're ok with that), follow the well-written directions, and you should be good to go. IMPORTANT!!!: It is very important that during the install you check the option about adding Python to your Path which happens on the first/second window of the installer executable!!!
The next piece which you need is pip, which is a nice Python Package Manager that we use to install the appropriate install files. If you download either the newest version of Python 2 (after v 2.7.9) and any version of Python3 starting with Python 3.4 you should have pip preinstalled. To make sure you have pip, run the following command in a PowerShell:
pip --version
If some stuff comes back giving you a version number, you'll be good to go. If not I'd recommend you update your Python (using the Python download link above) and in the process get pip by default!
Python can sometimes be a little difficult to get working on a Windows machine. The following resources may be helpful:
How to Add the Python Path In Windows 7Installing Python and Pip using Powershell
Also the internet has gotten so good, that you should never underestimate the power of just Googling your problem. Like if you get an error message, often times I just paste that error message into the search field, press return, and see that other people have already encountered (and hopefully solved) the problem I'm running into!
Based on personal experience, we've been able to get this working in Python 2.7 and Python 3.5 in Windows (Windows 7 and Windows 8). That being said, everyone's computer is different, so if you do run into problems, make sure you report them in the forum and we can all, as a community, try and figure it out and get it working!
Assuming you got everything working on the previous page, move into the course file you downloaded in your PowerShell. Once there, run the command (you may be prompted for a machine password based on your settings):
pip install -r req.txt
(Note: if you're using Python3 you may need to do pip3> install -r req.txt instead!)
It may take a minute or so depending on your machine. A whole bunch of text should fly by in a neutral color like green (if red stuff appears, it *may* mean there was an error in install. At that point I'd head to the forum and we'll try to see what we can figure out.).
If the install was a success, the next thing you need to do is start the server using Python. Type:
python server.py
Note: Depending on how you set up your Python, it may be called by the command "python3" rather than just "python". Try both if you have issues. On my several test installs on "clean" Windows machines, when installing Python 3.5, it just established "python" and "pip" as the appropriate commands, but it is possible that the could end up as "python3" and "pip3".
After starting running, some stuff will appear, but as long as it isn't very long it means you should be good. Head on over to a browser and in the URL field type:
localhost:3000
You should see something similar to that shown in the image below.
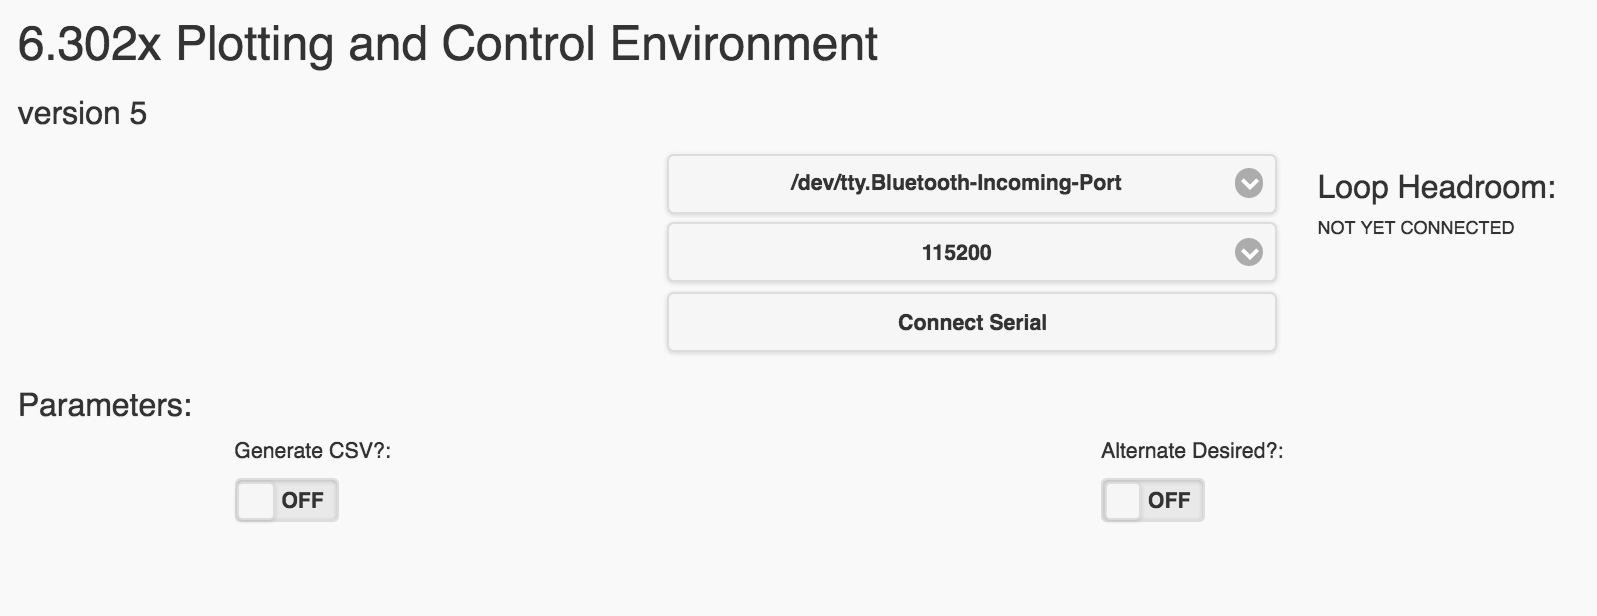
In the top pull-down tab at right, you should hopefully see the Serial port associated with your microcontroller (assuming drivers have been isntalled for it which will have been the case if you succssessfully uploaded the test code in the previous step/
Select your microcontroller, leave the BAUD pull down at 115200 (on some microcontrollers which use native USB for communication this doesn't matter, but still just leave it alone), and press Connect Serial. After a few seconds, a screen should load with some plots and sliders. Drag the sliders around and you should hopefully see the plots moving as well (not all sliders will change all plots). If you see this relationship (sliders cause plots to change) you're all set up!
Why is this seemingly mundane relationship between sliders and plots mean all is ok? Well because normally we'll use these sliders to control parameters on our microcontroller, and then the microcontroller will set values based on those parameters and send back up data it is collecting to be displayed in the plots. In this test code the sliders are linked to the plot variables on the microcontroller code (just in pretty much random ways for now), but beause you're seeing a slider change a plot, it means that we have full GUI-to-Microcontroller-to-GUI communication happening and all is right with the world!
In addition while the GUI is running you can click to Disconnect or Reconnect (give it a few seconds each time), and while Running, you can also Generate a CSV file of all of the plots and slider values ina GUI. This may be useful for analyzing your data later in the course. As we introduce more advanced GUIs and plots throughout the course we'll discuss the functionality it greater depth, but if you've got stuff working the way describe above, you should be good.
Note: If you are able to, updating to the most recent version of OSX (El Capitan) can minimize the chance of installation problems popping up with Python associated with stdio.h not being present
If you've got a Mac, chances are you most likely already have Python installed on your machine. If you go to the Launchpad and search for "Terminal" you should find a symbol that looks sort of like this:
If you're not familiar with the terminal, I would check out this link: How to Use Terminal on a Mac, just to see some basic commands. It can seem a bit intimidating at first, but it we aren't doing anything too difficult with it so just a bit of practice should be enough.
Open the terminal up and inside, type:
python --version
to see if you have Python Version 2 and:
python3 --version
to see if you have Python Version 3. Some text should come back telling you if you have Python and what version it is. Our code should work on both Python versions 2.7 and above as well as Python 3.3 and above. If you do not have Python installed, you need to do that. I'd recommend getting Python 3 for this software, though both families (2.7+ and 3+ will work). Go to the Python Download Page, find the appropriate install version for your computer, follow the directions, and you should be good.
The next piece which you need is pip, which is a nice Python Package Manager that we use to install the appropriate install files. If you download either the newest version of Python 2 (after v 2.7.9) and any version of Python3 starting with Python3.4 come with pip preinstalled. To make sure you have pip if you're using the Python 2 family, run:
pip --version
If you're using the Python 3 series, run:
pip3 --version
If some stuff comes back giving you a version number, you'll be good to go. If not I'd recommend you update your Python (using the Python download link above) and in the process get pip by default!
If you need to install pip without updating Python, we can try to address these issues in the forum if the internet at large doesn't answer your questions!
Assuming you got everything working on the previous page, move into the course file you downloaded in your Terminal. Once there, run the command (you may be prompted for a machine password based on your settings):
pip install -r req.txt
(Note: if you're using Python3 you may need to do pip3> install -r req.txt instead!)
It may take a minute or so depending on your machine. A whole bunch of text should fly by in a neutral color like green (if red stuff appears, it *may* mean there was an error in install. At that point I'd head to the forum and we'll try to see what we can figure out.).
If the install was a success, the next thing you need to do is start the server using Python. Type:
python server.py
Note: Depending on how you set up your Python, it may be called by the command "python3" rather than just "python". Try both if you have issues. On my several test installs on "clean" Windows machines, when installing Python 3.5, it just established "python" and "pip" as the appropriate commands, but it is possible that the could end up as "python3" and "pip3".
After starting running, some stuff will appear, but as long as it isn't very long it means you should be good. Head on over to a browser and in the URL field type:
localhost:3000
You should see something similar to that shown in the image below.
In the top pull-down tab at right, you should hopefully see the Serial port associated with your microcontroller (assuming drivers have been isntalled for it which will have been the case if you succssessfully uploaded the test code in the previous step/
Select your microcontroller, leave the BAUD pull down at 115200 (on some microcontrollers which use native USB for communication this doesn't matter, but still just leave it alone), and press Connect Serial. After a few seconds, a screen should load with some plots and sliders. Drag the sliders around and you should hopefully see the plots moving as well (not all sliders will change all plots). If you see this relationship (sliders cause plots to change) you're all set up!
Why is this seemingly mundane relationship between sliders and plots mean all is ok? Well because normally we'll use these sliders to control parameters on our microcontroller, and then the microcontroller will set values based on those parameters and send back up data it is collecting to be displayed in the plots. In this test code the sliders are linked to the plot variables on the microcontroller code (just in pretty much random ways for now), but beause you're seeing a slider change a plot, it means that we have full GUI-to-Microcontroller-to-GUI communication happening and all is right with the world!
In addition while the GUI is running you can click to Disconnect or Reconnect (give it a few seconds each time), and while Running, you can also Generate a CSV file of all of the plots and slider values ina GUI. This may be useful for analyzing your data later in the course. As we introduce more advanced GUIs and plots throughout the course we'll discuss the functionality it greater depth, but if you've got stuff working the way describe above, you should be good.
Depending on your Unix/Linux distribution, you may already have Python. You can check by opening up a terminal up and typing:
python --version
to see if you have Python Version 2 and:
python3 --version
to see if you have Python Version 3. Some text should come back telling you if you have Python and what version it is. Our code should work on both Python versions 2.7 and above as well as Python 3.3 and above. If you do not have Python installed, you need to do that. I'd recommend getting Python 3 for this software, though both families (2.7+ and 3+ will work). Go to the Python Download Page, find the appropriate install version for your computer, follow the directions, and you should be good.
Depending on your settings you could also just do:
sudo apt-get install python
for Python 2 or
sudo apt-get install python3
for Python 3.
The next piece which you need is pip, which is a nice Python Package Manager that we use to install the appropriate install files. If you download either the newest version of Python 2 (after v 2.7.9) and any version of Python3 starting with Python3.4 come with pip preinstalled. To make sure you have pip if you're using the Python 2 family, run:
pip --version
If you're using the Python 3 series, run:
pip3 --version
If some stuff comes back giving you a version number, you'll be good to go. If not I'd recommend you update your Python (using the Python download link above) and in the process get pip by default!
Assuming you've done everything you need to done all the tasks listed above and on previous pages, download the zip file provided, extract it, and then move into the newly extracted folder in your terminal. Once there, if you're using Python 2, run the command (you may be prompted for a machine password based on your settings):
sudo pip install -r req.txt
Or if you're a Python 3, do:
sudo pip3 install -r req.txt
A whole bunch of text should fly by in a neutral color like green (if red stuff appears, it *may* mean there was an error in install. At that point I'd head to the forum and we'll try to see what we can figure out.).
Note: One bug I ran into when installing on my Ubuntu v15.04 machine was I didn't have developer packages installed...If you get an error, try running:
sudo apt-get install python3-dev
sudo apt-get install libevent-dev
Then try the pip install again!
If the install was a success, the next thing you need to do is start the server using Python. If you're a Python 2 person type:
python server.py
If you're a Python 3 person type:
python3 server.py
Some stuff will appear, but as long as it isn't very long it means you should be good. Head on over to a browser and in the URL field type:
localhost:3000
You should see something similar to that shown in the image below.
In the top pull-down tab at right, you should hopefully see the Serial port associated with your microcontroller (assuming drivers have been isntalled for it which will have been the case if you succssessfully uploaded the test code in the previous step/
Select your microcontroller, leave the BAUD pull down at 115200 (on some microcontrollers which use native USB for communication this doesn't matter, but still just leave it alone), and press Connect Serial. After a few seconds, a screen should load with some plots and sliders. Drag the sliders around and you should hopefully see the plots moving as well (not all sliders will change all plots). If you see this relationship (sliders cause plots to change) you're all set up!
Why is this seemingly mundane relationship between sliders and plots mean all is ok? Well because normally we'll use these sliders to control parameters on our microcontroller, and then the microcontroller will set values based on those parameters and send back up data it is collecting to be displayed in the plots. In this test code the sliders are linked to the plot variables on the microcontroller code (just in pretty much random ways for now), but beause you're seeing a slider change a plot, it means that we have full GUI-to-Microcontroller-to-GUI communication happening and all is right with the world!
In addition while the GUI is running you can click to Disconnect or Reconnect (give it a few seconds each time), and while Running, you can also Generate a CSV file of all of the plots and slider values ina GUI. This may be useful for analyzing your data later in the course. As we introduce more advanced GUIs and plots throughout the course we'll discuss the functionality it greater depth, but if you've got stuff working the way describe above, you should be good.
If you like the plotting and control software we use in this course, totally feel free to use it in other things. We took a lot of student's complaints and problems from our January 2016 running of the course to make the software more robust but also still importantly free!
Documentation Here (work in progress :/ Sorry...ask questions in the forum...it'll motivate me to make this clearer. This stuff was written to ideally be usable in other settings as well. As a designer/engineer I find the ability to visualize my signals in real time to be critical to working effectively. While I have been blessed with ready accessibility to osciloscopes, even these can't readily display signals which I'm "creating" in an embedded systems environment (for example you'll see in this course that there is no natural "integral signal" coming from the potentiometer...we generate that ourselves in code...and consequently it is hard to see these things. We're hoping this will help people have a better time seeing what is actually going on.